Gimpster
New member
Hello everyone,
This weekend my Sonic was due for its first oil change. I figured I'd document it and take photos. Please keep in mind my methods might differ from yours, this isn't meant to be definitive or anything. Obviously I also own a 1.4T, so your 1.8 could be different. I also prefer to run the car a little before the change and then drain, but this is all up to you.
I'd also like to take a moment and say this isn't meant to become a "you used a FRAM filter!!!" type thread. I used it because, unlike the Delco filters on the shelf, it included a housing o-ring. Also after closely comparing it to the Delco filter the material and pleating seemed to be good. Not to mention it cost like $2.50 So please, if you prefer a different brand filter I don't blame you.... just don't rain on my parade.
Along those same lines I don't condone any particular oil brand or weight. I've personally done a few used analysis of Mobil1 0w-30 and was impressed. I recommend always coming to your OWN conclusions on oil. I live in a colder climate and prefer a 0w.
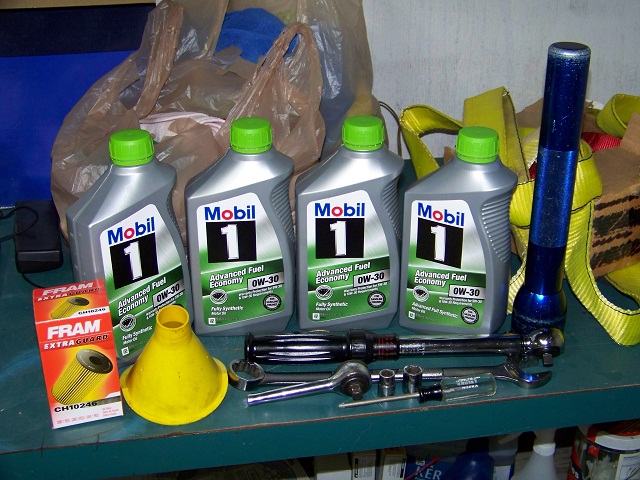
1.) You'll need the following to successfully change the oil and filter using my method:
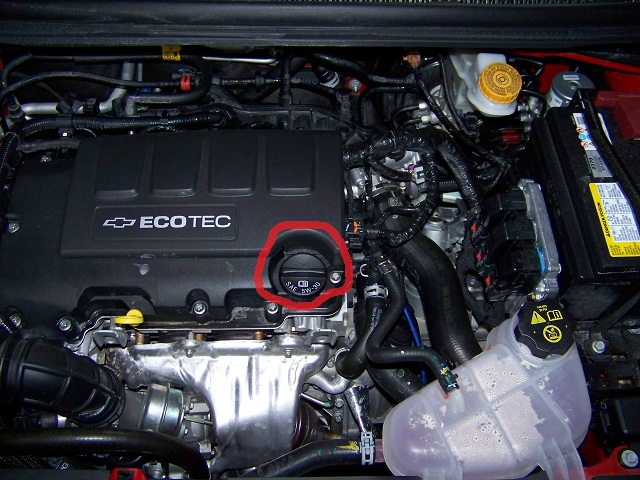
2.) Raise the hood, and loosen the oil cap circled in red. If you don't loosen the cap, the oil won't drain out smoothly and could cause a mess.
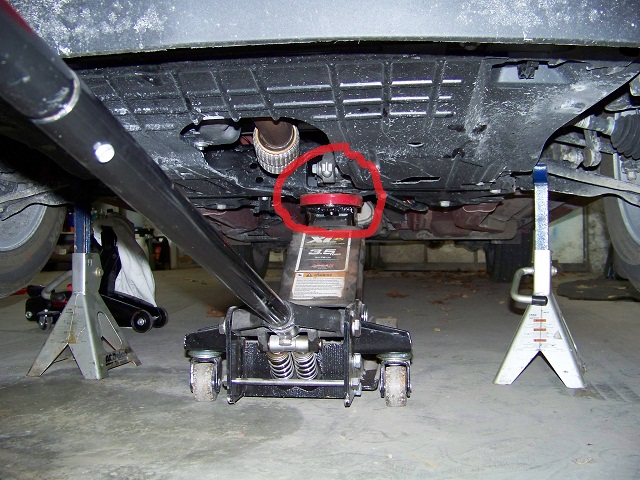
3.) Raise the car with a jack, and support it with jack stands. In my case, even with a low profile jack, I had to use a second jack on the rocker jack point to lift it up 1.5" before I could get my main floor jack underneath. As you can see circled in the red, near the rear engine mount is a beefy subframe to jack the vehicle up with. I then supported the car with a pair of jack stands on the lower control arms.
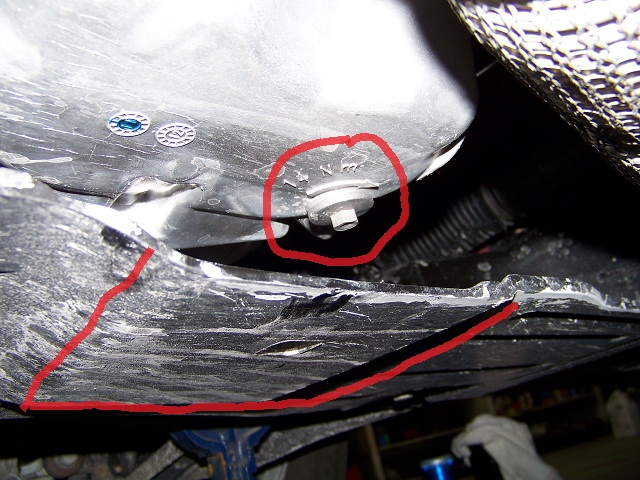
4a.) Hmm, now the first "problem". The oil pan drain is obstructed by the belly pan under the engine. It appears Chevrolet wants you to just drain the oil on to the belly pan and let it run out of that little hole. This is a bit messy for my tastes, so I opted to remove the belly pan... which takes about 2 minutes. My plan going forward on my next oil change will be to use a dremel and cut out the RED lined area to eliminate this issue for me.
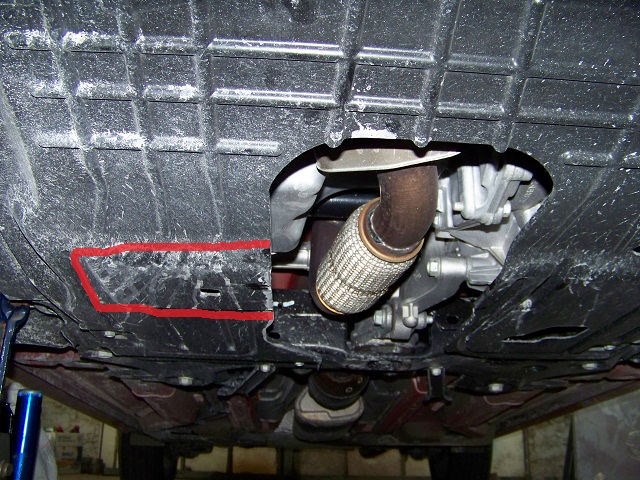
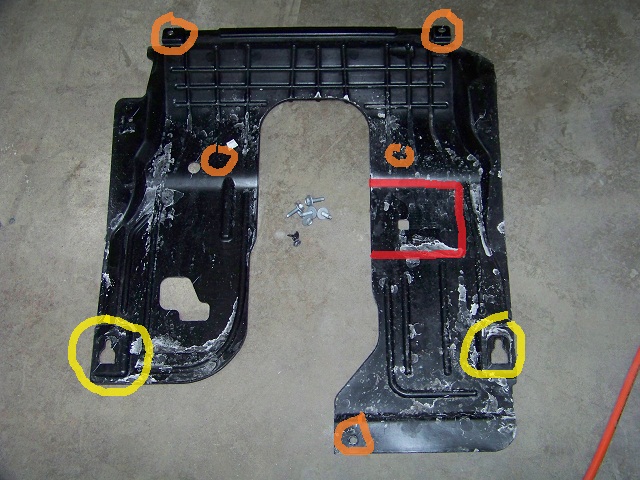
4b.) To remove the belly pan you must LOOSEN the two 13mm bolts in yellow, remove the three 13mm bolts and two Torx T-15 screws in orange. Once you do this the belly pan simply slides up and off of the two yellows you loosened. Once again I have the area I'm going to remove outlined with red. I'll do that next oil change.
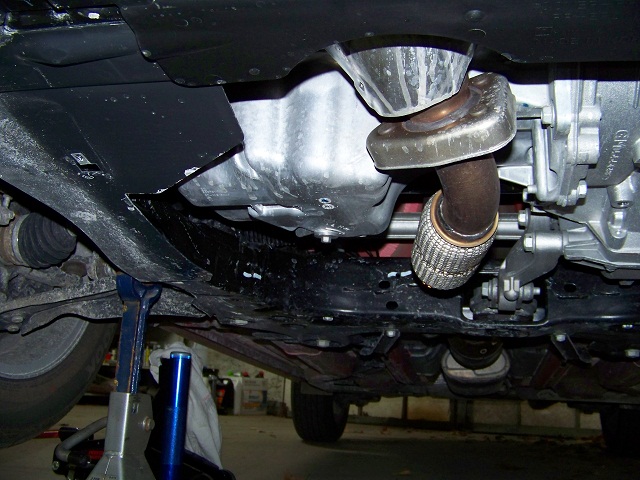
5.) Place an appropriate container below the oil pan drain, and remove the 10mm bolt. Once the oil has stopped draining, replace the bolt and torque it to 14nm or 125~ in. lbs. You'll notice the drain plug is a captive o-ring, and I opted to just reuse mine this first time. It's not leaking, but I need to head to Chevy and see if the o-ring itself is replaceable or what. When I know more I'll update this thread.
At this point you may reinstall the belly pan and lower the vehicle.
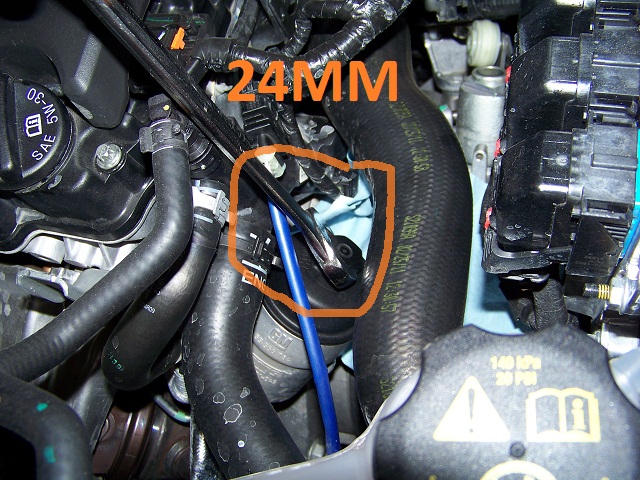
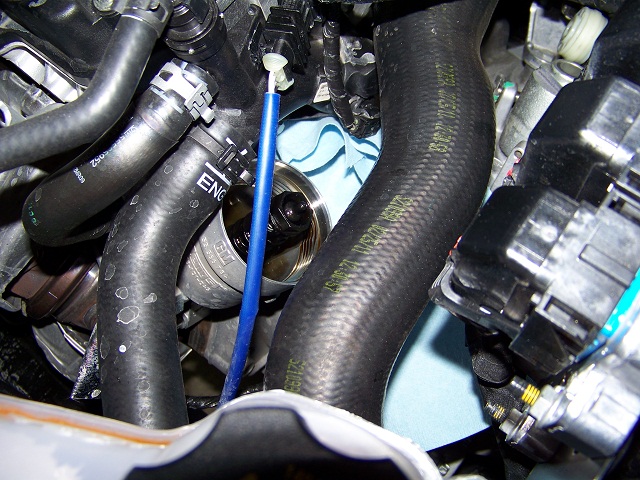
6.) Head up to the engine compartment, and to the right and below of the oil fill you'll see the top of the filter housing. Place a rag below and around the housing to contain any spillage. Using whatever means you have available, loosen the cap (its 24mm), push the charge piping out of the way and lift the entire cap/filter out. Its best to have a rag around to catch any spillage off of that too. Clean in and around the filter housing with a clean rag. note that the o2 sensor wire gets in the way a bit too.
Removed:
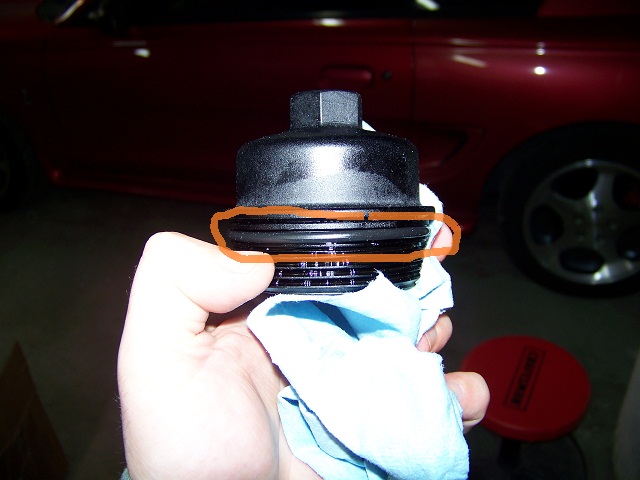
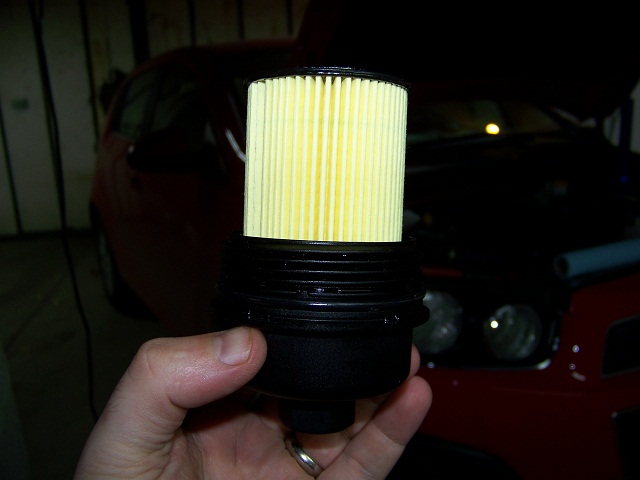
7.) Remove and responsibly dispose of the used filter off the cap. Also remove the o-ring circled in orange and dispose of it too and then clean the cap. Place the new o-ring on the cap and lubricate it lightly with fresh oil. Place the filter onto the cap with the LARGE HOLE out, the small side will snap into the cap. Place the cap back into the housing and thread it on GENTLY by hand, you don't want to cross thread this. I didn't have a socket that could easily be used on the cap without removing the charge pipe, so I just snugged it down gently. Use your best judgement here. I've read there is an actual tool made to make this easier?
8.) Fill the car with 4 quarts of oil, and if you don't want to do my option step below just idle the car a few minutes and re-check your oil level with the dipstick. 4 quarts filled mine up just perfect!
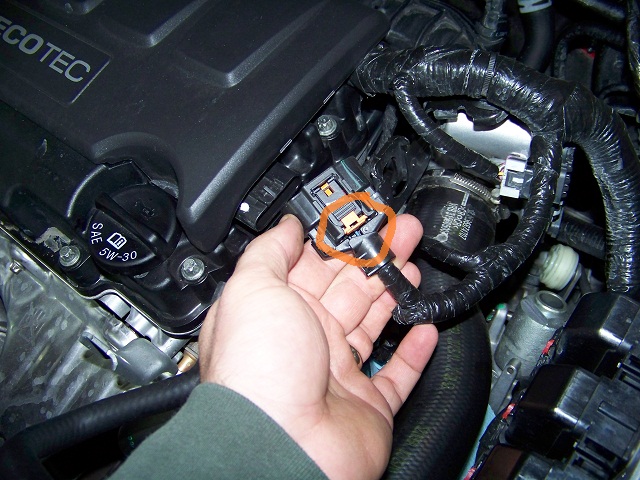
OPTIONAL 9.) I personally don't like to start a car dry on oil like that. On my Sonic I disconnected the coil pack and turned the key 3 cycles to allow some oil to cycle through the engine. The plug takes seconds to remove, and doesn't cause a code or anything like that. Basically just slide BACK the orange tab circled in the below picture. Once you're happy the engine has cycled enough oil, plug this back in and press the orange tab back in.
This weekend my Sonic was due for its first oil change. I figured I'd document it and take photos. Please keep in mind my methods might differ from yours, this isn't meant to be definitive or anything. Obviously I also own a 1.4T, so your 1.8 could be different. I also prefer to run the car a little before the change and then drain, but this is all up to you.
I'd also like to take a moment and say this isn't meant to become a "you used a FRAM filter!!!" type thread. I used it because, unlike the Delco filters on the shelf, it included a housing o-ring. Also after closely comparing it to the Delco filter the material and pleating seemed to be good. Not to mention it cost like $2.50
Along those same lines I don't condone any particular oil brand or weight. I've personally done a few used analysis of Mobil1 0w-30 and was impressed. I recommend always coming to your OWN conclusions on oil. I live in a colder climate and prefer a 0w.
1.) You'll need the following to successfully change the oil and filter using my method:
- Floor jack, the lower the better
- Jack stands
- 3/8" or 1/4" socket wrench
- 10mm socket
- 13mm socket
- 24mm open end wrench OR the fancy Ecotec filter housing tool
- T15 Torx
- Torque wrench (optional I suppose)
- Funnel
- 4 quarts of oil
- Oil filter + oil filter cap o-ring
- Oil drain plug o-ring (TBD, will discuss more)
- Used oil receptacle
- Maybe a flashlight

2.) Raise the hood, and loosen the oil cap circled in red. If you don't loosen the cap, the oil won't drain out smoothly and could cause a mess.

3.) Raise the car with a jack, and support it with jack stands. In my case, even with a low profile jack, I had to use a second jack on the rocker jack point to lift it up 1.5" before I could get my main floor jack underneath. As you can see circled in the red, near the rear engine mount is a beefy subframe to jack the vehicle up with. I then supported the car with a pair of jack stands on the lower control arms.

4a.) Hmm, now the first "problem". The oil pan drain is obstructed by the belly pan under the engine. It appears Chevrolet wants you to just drain the oil on to the belly pan and let it run out of that little hole. This is a bit messy for my tastes, so I opted to remove the belly pan... which takes about 2 minutes. My plan going forward on my next oil change will be to use a dremel and cut out the RED lined area to eliminate this issue for me.


4b.) To remove the belly pan you must LOOSEN the two 13mm bolts in yellow, remove the three 13mm bolts and two Torx T-15 screws in orange. Once you do this the belly pan simply slides up and off of the two yellows you loosened. Once again I have the area I'm going to remove outlined with red. I'll do that next oil change.

5.) Place an appropriate container below the oil pan drain, and remove the 10mm bolt. Once the oil has stopped draining, replace the bolt and torque it to 14nm or 125~ in. lbs. You'll notice the drain plug is a captive o-ring, and I opted to just reuse mine this first time. It's not leaking, but I need to head to Chevy and see if the o-ring itself is replaceable or what. When I know more I'll update this thread.
At this point you may reinstall the belly pan and lower the vehicle.

6.) Head up to the engine compartment, and to the right and below of the oil fill you'll see the top of the filter housing. Place a rag below and around the housing to contain any spillage. Using whatever means you have available, loosen the cap (its 24mm), push the charge piping out of the way and lift the entire cap/filter out. Its best to have a rag around to catch any spillage off of that too. Clean in and around the filter housing with a clean rag. note that the o2 sensor wire gets in the way a bit too.

Removed:

7.) Remove and responsibly dispose of the used filter off the cap. Also remove the o-ring circled in orange and dispose of it too and then clean the cap. Place the new o-ring on the cap and lubricate it lightly with fresh oil. Place the filter onto the cap with the LARGE HOLE out, the small side will snap into the cap. Place the cap back into the housing and thread it on GENTLY by hand, you don't want to cross thread this. I didn't have a socket that could easily be used on the cap without removing the charge pipe, so I just snugged it down gently. Use your best judgement here. I've read there is an actual tool made to make this easier?


8.) Fill the car with 4 quarts of oil, and if you don't want to do my option step below just idle the car a few minutes and re-check your oil level with the dipstick. 4 quarts filled mine up just perfect!
OPTIONAL 9.) I personally don't like to start a car dry on oil like that. On my Sonic I disconnected the coil pack and turned the key 3 cycles to allow some oil to cycle through the engine. The plug takes seconds to remove, and doesn't cause a code or anything like that. Basically just slide BACK the orange tab circled in the below picture. Once you're happy the engine has cycled enough oil, plug this back in and press the orange tab back in.

Last edited:
