jayrq2o1
New member
Hey everybody, sorry for not posting in FOREVER. Here's how to remove your bumper. As a forewarning (if the DIY disclaimer wasn't enough), the only time you will ever need to remove your bumper is if;
You want to replace or repair your grill.
You want to do a major modification to the intake or otherwise.
You're curious and want to see what the intercooler looks like.
You like to drive without a bumper?
A family of raccoon or possum has moved in and you need to violently evict them (rare).
In all cases, this is no small task. Put aside at least three hours for this project at BEST.
First step, download the pics from Beastlick's post.
http://www.sonicownersforum.com/forum/do-yourself-articles/6024-front-bumper-removal.html
You can use these for reference. It's where I started and it helped me on my first removal. I did notice a few things that differed from the instructions, however, so I decided a long time ago I would do a full step-by-step thread but have only recently got around to remember to take pictures this time.
Before moving on, note that this job can be done with or without raising your car (lift, stands, ramps, etc.) but will probably be easier with it off the ground. The need for smaller tools can be alleviated this way. You can also gain easier access to the wheel well by either full opting the steering to suit your needs or removing the tires entirely.
Step 2, grab some tools. You will need
The T20 bit or driver is IMPERATIVE. All the screws (except two) are body screws and shouldn't be torqued too tight, but don't come crying to me when your hex key/Allen wrench or small flat head screw driver rounds out the insides into nothing.
The flat head screwdriver is for the body rivets.
The Philips head is for two body screws that hide under neath the mud guard.
The 10 and 13 mm sockets are for the machine bolts (although they don't really hold anything mechanical) at the top and bottom respectively.
Step 3
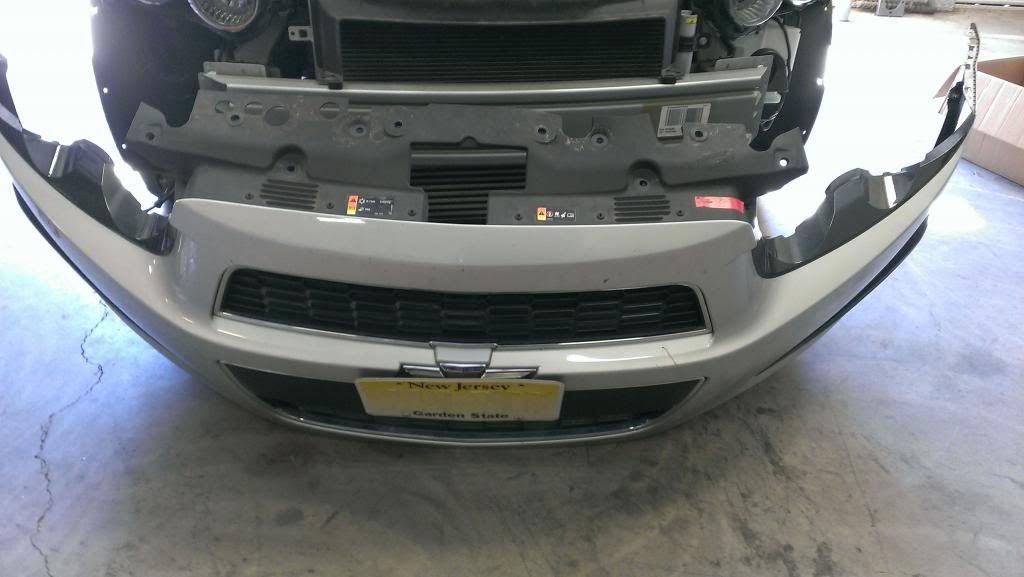
Start disassembling. From here, the following pictures can be done in any order since all of the screws, bolts and rivets only secure the bumper, but don't actually hold the bumper on. What really holds the bumper are two big chunks of plastic that slot into the front, so removing all the hardware won't cause the bumper to drop.
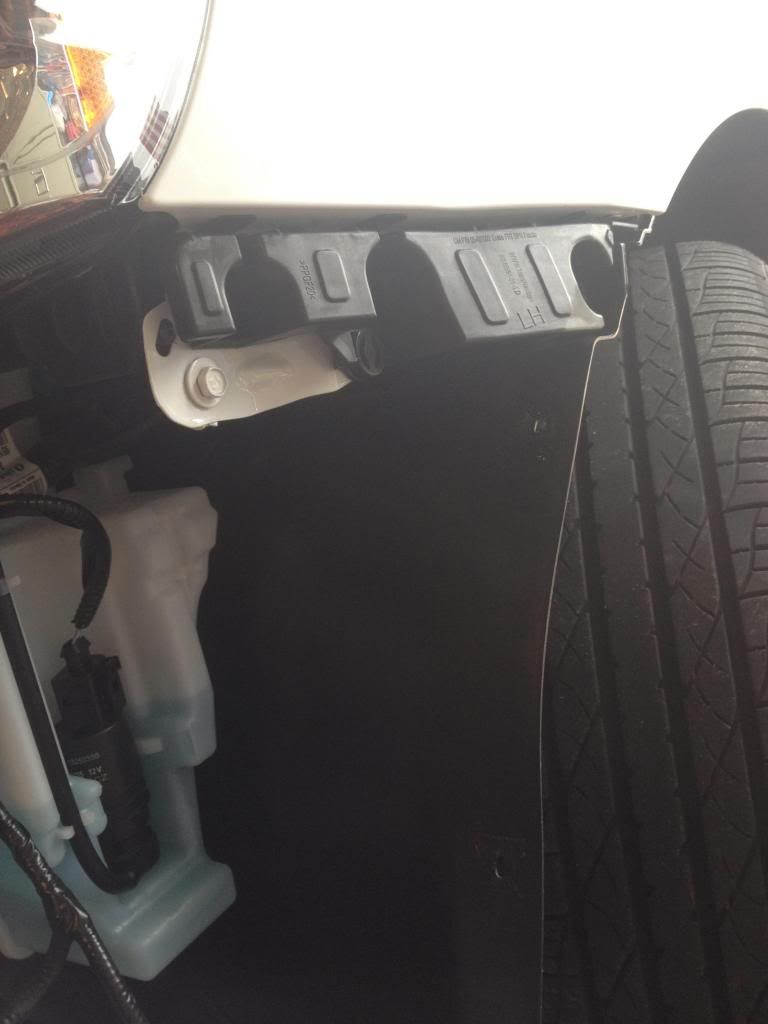
I usually start in the wheel wells. Here's a pic of the four screws you need to remove. All are T20 heads. One hides inside a little depression. Also in that depression is a hole that gives you access to the three tabs that help hold the bumper to the car. I actually destroyed mine (no pic), and my bumper still stays on just fine. It even stays seamless with the fender, but if you're not as lazy, a small flat head should be able to reach all the tabs and you can save your bumper some damage.

After removing these four screws (and if you did the tabs too), now is a good time to grab the bumper by the edge and pull it from the car. It's flexible that it shouldn't break anything, but don't go Hulk on it. If you're worried, you can save it for after you remove the bottom screws.
I usually move on to the bottom next and save the top for last.
There are three screws on either side of the car, one in the center, two 13 mm bolts and one of two body screws you can remove to slide out the intermediate mud guard.
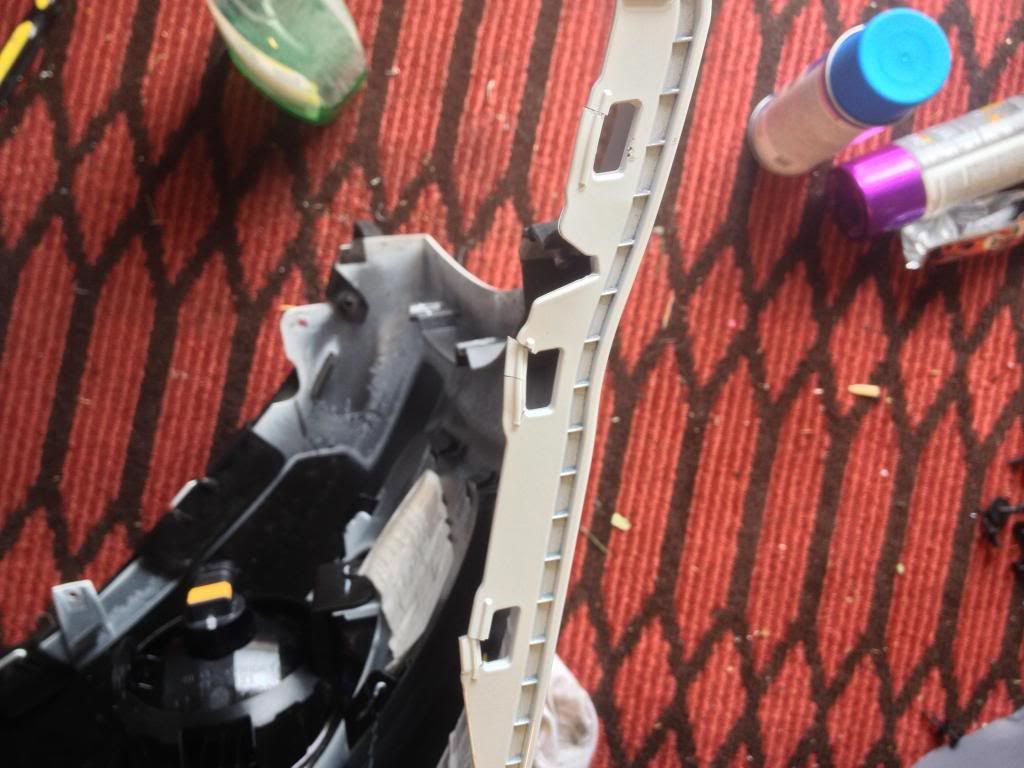
First up, two of the three screws. These two secure the wheel well cover to the bumper and vice versa. Notice that there are Philips head screws all along the bumper. These just secure the lip and removal is not necessary. So if you're planning on swapping a lip, you don't have to remove the bumper.

Next, the third one. You can probably find it if you just follow along the bumper, but here's a pic anyway. These two screws (remember there's also more on the driver's side) secure the intermediate guard to the bumper and vice versa.

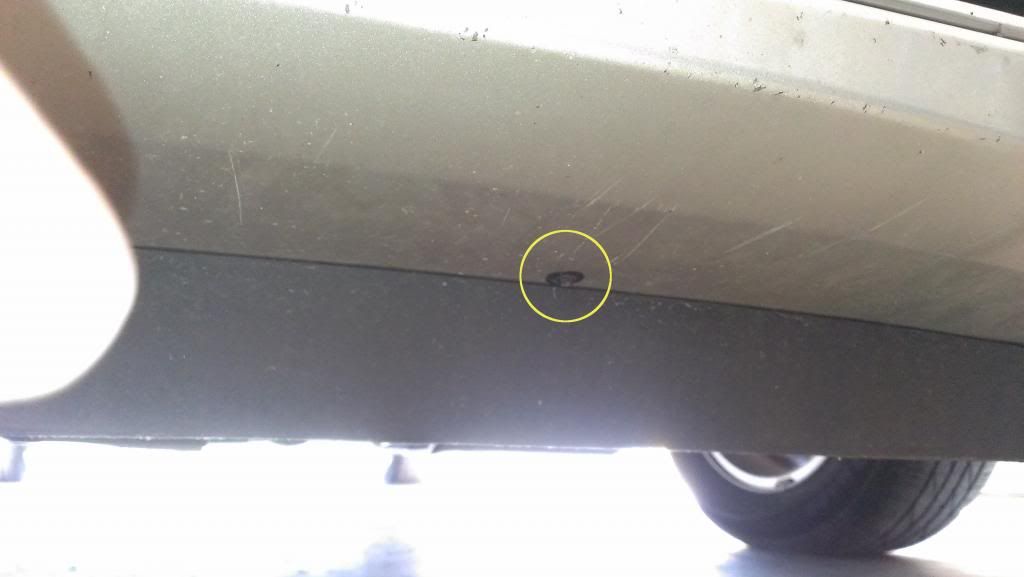
Now the center screw. It is dead center on the bumper and its only purpose is to hold the intermediate mud guard. Since there's two body screws and two 13 mm bolts holding it, I really don't see the purpose of this screw. If you want to save .001 lbs, you can probably just leave it out. I always put it back (damn OCD).
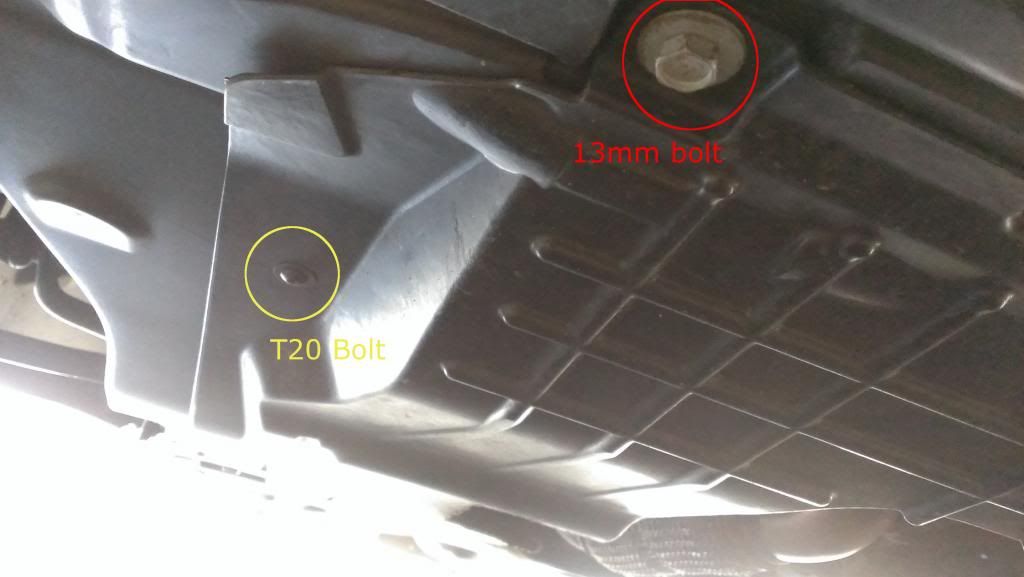
Next up, the 13 mm bolts and one or two of the outlying body screws. These screws secure the main mud guard to the body. The two bolts also serve this purpose as well as secure the intermediate guard. By removing one of the screws, you can just slide the intermediate guard out. If you wanted a little access to your engine bay (let's say, for installing silicone charge tubes?) then you can remove both screws. In either case, both 13's need to go.
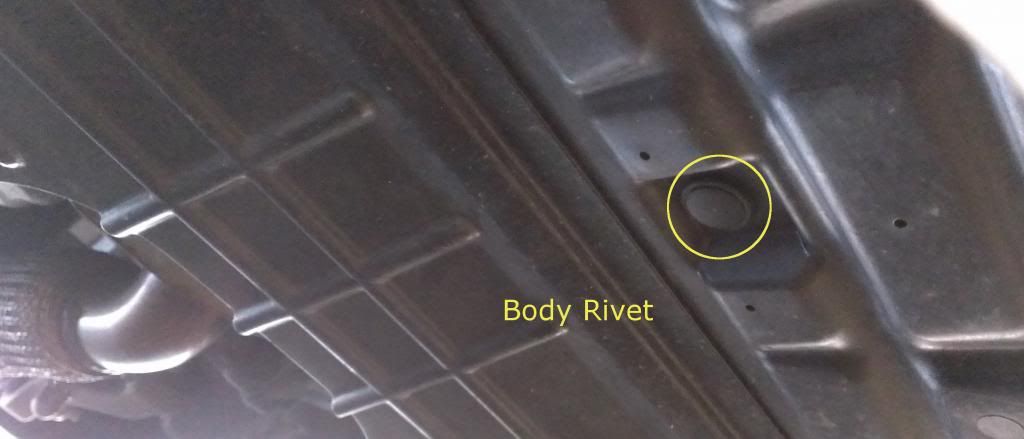
The lone body rivet. Again, it only serves one purpose that other hardware is better at - holding that little intermediate guard. It's pretty superfluous, but I guess it doesn't hurt not to put it back every time.
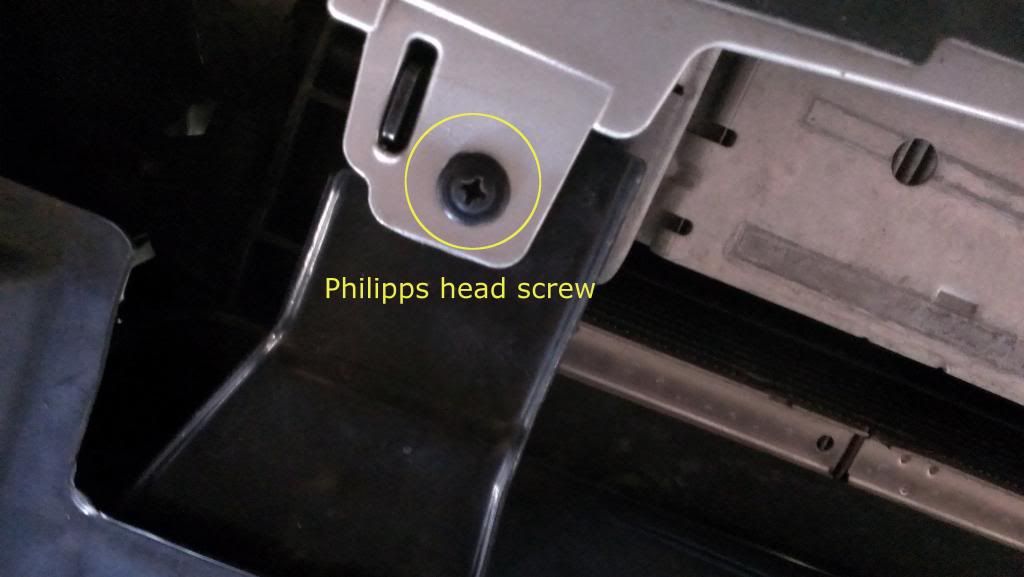
And finally, the last thing you'll need to do underneath. Now with the intermediate guard removed, you can slide it out from between the main mud guard and the bumper. This will give you access to these two a hole screws, err, I mean Philips head screws. Why GM thought they needed to make ninja screws is beyond me, but there they are. Remove these two and move to the top.
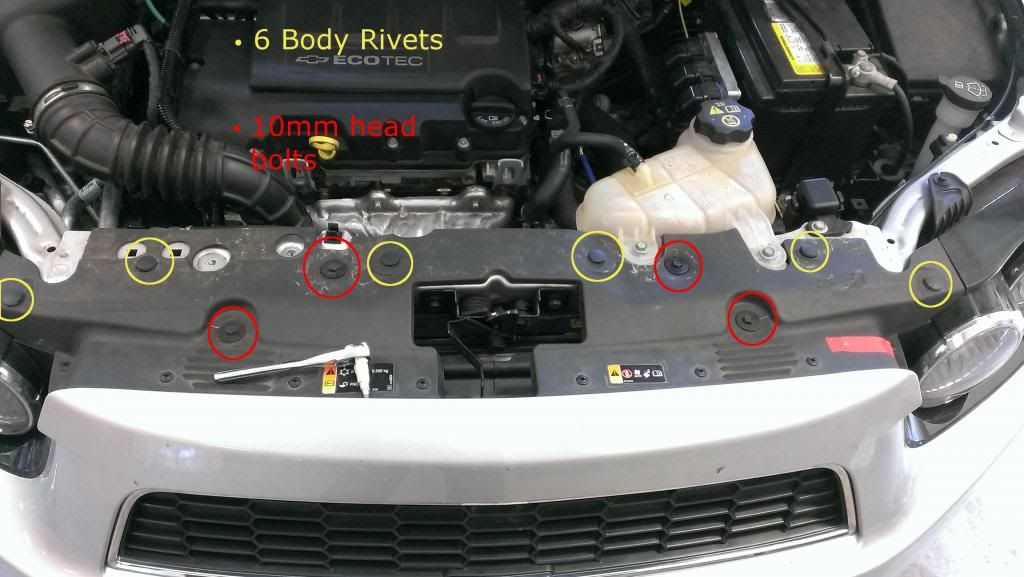
On to the top. Here you'll see four 10 mm bolts and six body rivets. Do NOT mix up the body rivets. If you do, at least remember that the bottom rivet is ever so slightly larger than these and none of these can hold the intermediate guard on.
If you haven't already, pull out the sides from the wheel well and begin to pull at the top grill. It might take a few tries to find your own way of dealing with it, but it should eventually give. When it does though, DON'T RUN AWAY WITH IT!!! Because...
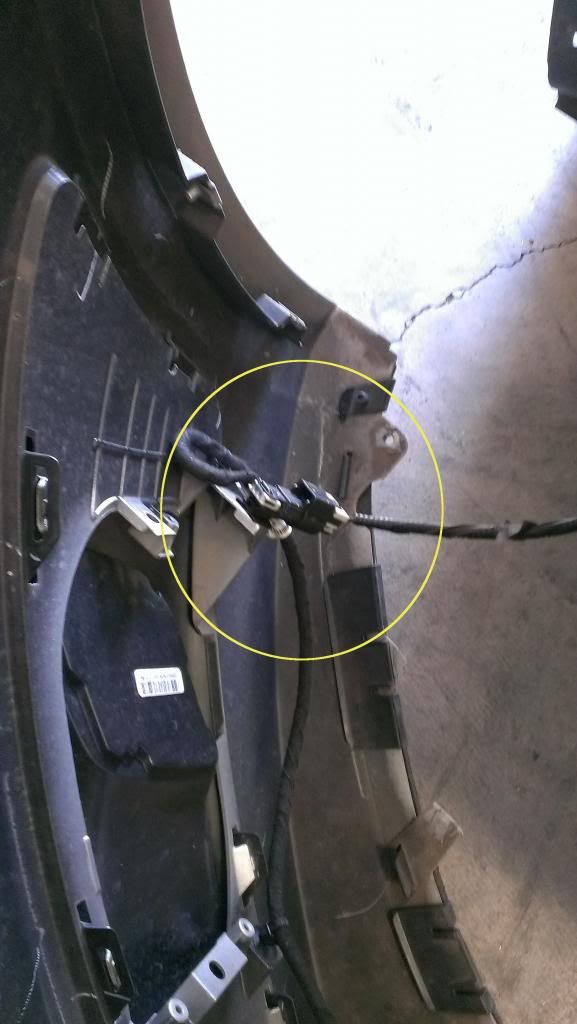
...you don't want to destroy your ambient air temp sensor and/or your fog light connectors. I don't have fogs, but the connector should be similar to everything you've seen so far on the car. Slide out the lock that prevents the lock release and press down on the release to release the lock (yo dawg).
Congrats! You have successfully removed your bumper.
Please PM me if you have any questions or if I need to edit something.
Thanks!
You want to replace or repair your grill.
You want to do a major modification to the intake or otherwise.
You're curious and want to see what the intercooler looks like.
You like to drive without a bumper?
A family of raccoon or possum has moved in and you need to violently evict them (rare).
In all cases, this is no small task. Put aside at least three hours for this project at BEST.
First step, download the pics from Beastlick's post.
http://www.sonicownersforum.com/forum/do-yourself-articles/6024-front-bumper-removal.html
You can use these for reference. It's where I started and it helped me on my first removal. I did notice a few things that differed from the instructions, however, so I decided a long time ago I would do a full step-by-step thread but have only recently got around to remember to take pictures this time.
Before moving on, note that this job can be done with or without raising your car (lift, stands, ramps, etc.) but will probably be easier with it off the ground. The need for smaller tools can be alleviated this way. You can also gain easier access to the wheel well by either full opting the steering to suit your needs or removing the tires entirely.
Step 2, grab some tools. You will need
- T20 bit, 1/4" socket and small ratchet or a T20 stubby screwdriver
- Flat head screwdriver
- Philips head stubby screwdriver
- 10mm socket or wrench
- 13mm socket or wrench
The T20 bit or driver is IMPERATIVE. All the screws (except two) are body screws and shouldn't be torqued too tight, but don't come crying to me when your hex key/Allen wrench or small flat head screw driver rounds out the insides into nothing.
The flat head screwdriver is for the body rivets.
The Philips head is for two body screws that hide under neath the mud guard.
The 10 and 13 mm sockets are for the machine bolts (although they don't really hold anything mechanical) at the top and bottom respectively.
Step 3
Start disassembling. From here, the following pictures can be done in any order since all of the screws, bolts and rivets only secure the bumper, but don't actually hold the bumper on. What really holds the bumper are two big chunks of plastic that slot into the front, so removing all the hardware won't cause the bumper to drop.
I usually start in the wheel wells. Here's a pic of the four screws you need to remove. All are T20 heads. One hides inside a little depression. Also in that depression is a hole that gives you access to the three tabs that help hold the bumper to the car. I actually destroyed mine (no pic), and my bumper still stays on just fine. It even stays seamless with the fender, but if you're not as lazy, a small flat head should be able to reach all the tabs and you can save your bumper some damage.
After removing these four screws (and if you did the tabs too), now is a good time to grab the bumper by the edge and pull it from the car. It's flexible that it shouldn't break anything, but don't go Hulk on it. If you're worried, you can save it for after you remove the bottom screws.
I usually move on to the bottom next and save the top for last.
There are three screws on either side of the car, one in the center, two 13 mm bolts and one of two body screws you can remove to slide out the intermediate mud guard.
First up, two of the three screws. These two secure the wheel well cover to the bumper and vice versa. Notice that there are Philips head screws all along the bumper. These just secure the lip and removal is not necessary. So if you're planning on swapping a lip, you don't have to remove the bumper.
Next, the third one. You can probably find it if you just follow along the bumper, but here's a pic anyway. These two screws (remember there's also more on the driver's side) secure the intermediate guard to the bumper and vice versa.
Now the center screw. It is dead center on the bumper and its only purpose is to hold the intermediate mud guard. Since there's two body screws and two 13 mm bolts holding it, I really don't see the purpose of this screw. If you want to save .001 lbs, you can probably just leave it out. I always put it back (damn OCD).
Next up, the 13 mm bolts and one or two of the outlying body screws. These screws secure the main mud guard to the body. The two bolts also serve this purpose as well as secure the intermediate guard. By removing one of the screws, you can just slide the intermediate guard out. If you wanted a little access to your engine bay (let's say, for installing silicone charge tubes?) then you can remove both screws. In either case, both 13's need to go.
The lone body rivet. Again, it only serves one purpose that other hardware is better at - holding that little intermediate guard. It's pretty superfluous, but I guess it doesn't hurt not to put it back every time.
And finally, the last thing you'll need to do underneath. Now with the intermediate guard removed, you can slide it out from between the main mud guard and the bumper. This will give you access to these two a hole screws, err, I mean Philips head screws. Why GM thought they needed to make ninja screws is beyond me, but there they are. Remove these two and move to the top.
On to the top. Here you'll see four 10 mm bolts and six body rivets. Do NOT mix up the body rivets. If you do, at least remember that the bottom rivet is ever so slightly larger than these and none of these can hold the intermediate guard on.
If you haven't already, pull out the sides from the wheel well and begin to pull at the top grill. It might take a few tries to find your own way of dealing with it, but it should eventually give. When it does though, DON'T RUN AWAY WITH IT!!! Because...
...you don't want to destroy your ambient air temp sensor and/or your fog light connectors. I don't have fogs, but the connector should be similar to everything you've seen so far on the car. Slide out the lock that prevents the lock release and press down on the release to release the lock (yo dawg).
Congrats! You have successfully removed your bumper.
Please PM me if you have any questions or if I need to edit something.
Thanks!