TheFallenAngel12
New member
Hi Everyone, I recently bought the new K&N Air Filter for my 2012 Chevrolet Sonic 1.8L Sedan and thought i would write up a How To Article on how to change out the Stock Air Filter With the New K&N Air Filter on a 1.8 Sedan Sonic. I would Assume the Hatchback 1.8 would be the same way. I Dont know about the 1.4 Intake Box if it would be the same or not?
Lets Start Off By Opening up the Hood and Exposing the Engine...
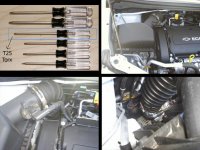
Step 1 - 1st Picture - Now that the Hood is Open and You can see the engine. Locate the Air Intake Box which can be found to your Far Left on the 1.8 Engine with the Intake hose going towards the rear of the engine bay.
> You wont need to touch the MAF Sesor, just showed it for reference. Also Pictured is the One Tool you will need to complete this task. You may now move onto the next step and start the Removal of the Air Box Cover...
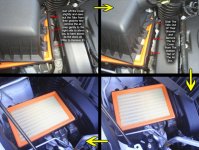
Step 2 - 2nd Picture - On The Air Intake box there are 2 Torx Screws you need to loosen in order to open the Air Box Cover. These are T25 Torx Screws that can be removed using the T25 ScrewDriver Shown in the previous picture. If you dont have one, ask a friend or family member that has alot of tools. Im Sure someone you know has one.
> Slowly Unscrew the T25 Screws on the top and left side of the air box as indicated in the picture and hold onto the screws as you loosen them so not to drop them into the engine bay. Once you have the screws loosened and removed, set them aside in a safe place and move on to the next step...
Step 3 - 3rd Picture - To remove the Air Box Cover, Simply Ease up on the left side of the loosened cover and slide it to your left gently removing the Air box cover tabs out of thier grooves as shown in the picture.
> Once you have the cover loosened from the bottom peice gently position it to your right so that it exposes the Stock Air Filter and allows you room to remove it. You May Move onto the Next Step...
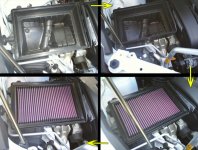
Step 4 - 4th Picture - Remove the Stock Air Filter and check the Air Box for any dirt or debre and clean accordingly to make sure you have a clean box ready for the new filter.
> Once you have a nice clean box, Proceed with unwrapping your new K&N Air Filter and Place it into the Stock Air Box with the Filter base facing down and it should look as it does in the Picture. Once you have the new Air Filter in the Stock Box, You can Move onto the Next Step...
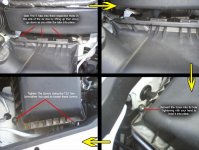
Step 5 - 5th Picture - Once The Filter has been put into place. You can Re-install the Air Box Cover by simply reversing what you did to remove it. Simply position the Tabs into the Grooves at a slight angle pushing in gently as you push the Cover down. This may take a few trys as the new air fitler rubber gets slightly in the way of the grooves.
> Once you have the Cover back on as it was before. Place the 2 T25 Screws back into thier respective holes and hand tighten to hold them into place. Then Grab your T25 Screw Driver and Tighten each Screw being careful to not over tighten them.
> Once you have the screws back in place and tightened accordingly... Congradulations :banana: You have just Installed Your New K&N (or whichever Brand) Air Filter!!!
> If you would like to, you may install the Given Sticker provided with your K&N Air Filter onto the Stock Air Box Cover so that the Dealership wont remove the Filter and know you have a new Better Air Filter Installed.
----------------------------------------------------
I noticed after installing the K&N Air Filter that my car responded alot better. The gears shifted alot smoother. I accelerated alot smoother and slighty better. And it makes the engine sound really cool. Gas mileage wise i cant say yet as i havent driven the car enough yet to say. Hope this helps you all out and Enjoy Your New Air Filter!!
Lets Start Off By Opening up the Hood and Exposing the Engine...
Step 1 - 1st Picture - Now that the Hood is Open and You can see the engine. Locate the Air Intake Box which can be found to your Far Left on the 1.8 Engine with the Intake hose going towards the rear of the engine bay.
> You wont need to touch the MAF Sesor, just showed it for reference. Also Pictured is the One Tool you will need to complete this task. You may now move onto the next step and start the Removal of the Air Box Cover...
Step 2 - 2nd Picture - On The Air Intake box there are 2 Torx Screws you need to loosen in order to open the Air Box Cover. These are T25 Torx Screws that can be removed using the T25 ScrewDriver Shown in the previous picture. If you dont have one, ask a friend or family member that has alot of tools. Im Sure someone you know has one.
> Slowly Unscrew the T25 Screws on the top and left side of the air box as indicated in the picture and hold onto the screws as you loosen them so not to drop them into the engine bay. Once you have the screws loosened and removed, set them aside in a safe place and move on to the next step...
Step 3 - 3rd Picture - To remove the Air Box Cover, Simply Ease up on the left side of the loosened cover and slide it to your left gently removing the Air box cover tabs out of thier grooves as shown in the picture.
> Once you have the cover loosened from the bottom peice gently position it to your right so that it exposes the Stock Air Filter and allows you room to remove it. You May Move onto the Next Step...
Step 4 - 4th Picture - Remove the Stock Air Filter and check the Air Box for any dirt or debre and clean accordingly to make sure you have a clean box ready for the new filter.
> Once you have a nice clean box, Proceed with unwrapping your new K&N Air Filter and Place it into the Stock Air Box with the Filter base facing down and it should look as it does in the Picture. Once you have the new Air Filter in the Stock Box, You can Move onto the Next Step...
Step 5 - 5th Picture - Once The Filter has been put into place. You can Re-install the Air Box Cover by simply reversing what you did to remove it. Simply position the Tabs into the Grooves at a slight angle pushing in gently as you push the Cover down. This may take a few trys as the new air fitler rubber gets slightly in the way of the grooves.
> Once you have the Cover back on as it was before. Place the 2 T25 Screws back into thier respective holes and hand tighten to hold them into place. Then Grab your T25 Screw Driver and Tighten each Screw being careful to not over tighten them.
> Once you have the screws back in place and tightened accordingly... Congradulations :banana: You have just Installed Your New K&N (or whichever Brand) Air Filter!!!
> If you would like to, you may install the Given Sticker provided with your K&N Air Filter onto the Stock Air Box Cover so that the Dealership wont remove the Filter and know you have a new Better Air Filter Installed.
----------------------------------------------------
I noticed after installing the K&N Air Filter that my car responded alot better. The gears shifted alot smoother. I accelerated alot smoother and slighty better. And it makes the engine sound really cool. Gas mileage wise i cant say yet as i havent driven the car enough yet to say. Hope this helps you all out and Enjoy Your New Air Filter!!
Attachments
-
 Step 1 - Tools Needed and Air Box View.jpg70.3 KB · Views: 616
 -
 Step 2 - Remove The Torx Screws with T25 Driver.jpg63.6 KB · Views: 547
 -
 Step 3 - Lift Air Box Cover and Slide Tabs Out.jpg80.1 KB · Views: 569
 -
 Step 4 - Remove Old Filter and Replace with New Filter.jpg82.5 KB · Views: 604
 -
 Step 5 - Re-Install The Air Box Cover and Screws.jpg61.8 KB · Views: 557